Agent Matching
Agent Matching is an automatic verification step that identifies potential duplicate agent records before they are created during an import. When a carrier reports an agent name that is phonetically or structurally similar to an existing record (such as "Doe, John E" vs. "John Doe"), the system pauses to let you decide whether to link the names or treat them as separate agents.
💡 Why Use This
Use Agent Matching when:
- A carrier uses a different name format — The name on the statement doesn't exactly match your existing Agent record.
- You want to prevent duplicate agent profiles — Catching duplicates at import time is faster than cleaning up the database later.
- You are processing a new carrier's first statement — New carriers frequently use name formats that differ from your database conventions.
🗺️ How to Access
The Agent Matching screen appears automatically during the Create Policies workflow when the system detects agent names that may match existing records.
Using the Matching Interface
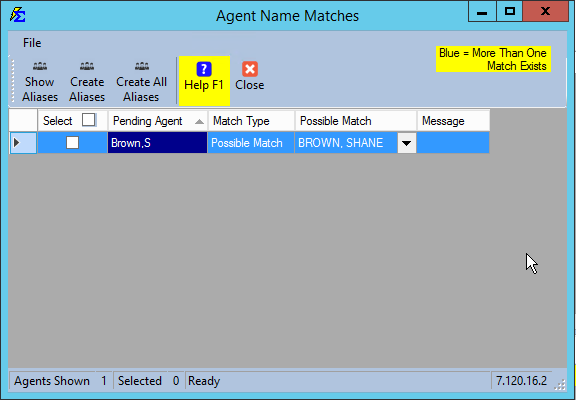
When the system detects a name that isn't an exact match but is phonetically or structurally similar to an existing agent, it flags it for your review.

Identifying Possible Matches
If the system finds more than one potential match, the Possible Match column is highlighted in light blue. Click the dropdown arrow in that cell to select the correct agent from the list of candidates.
Step-by-Step: Processing Matches
- Review the list of pending agents found during the import.
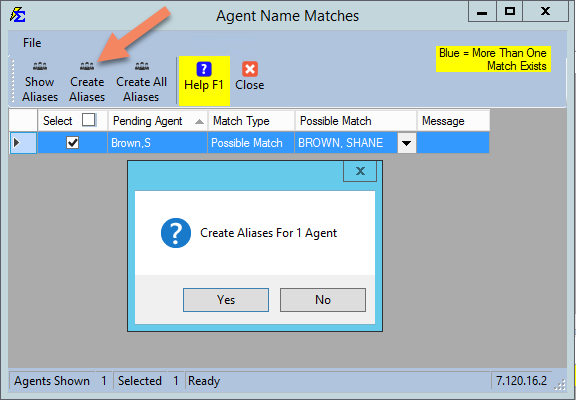
- Select the checkbox next to each agent whose match is correct.
- Click Create Aliases to process only your selected matches.
- Alternatively, click Create All Aliases if you have verified that every suggested match in the list is correct.
What Happens After Matching
Once an Agent Alias is created:
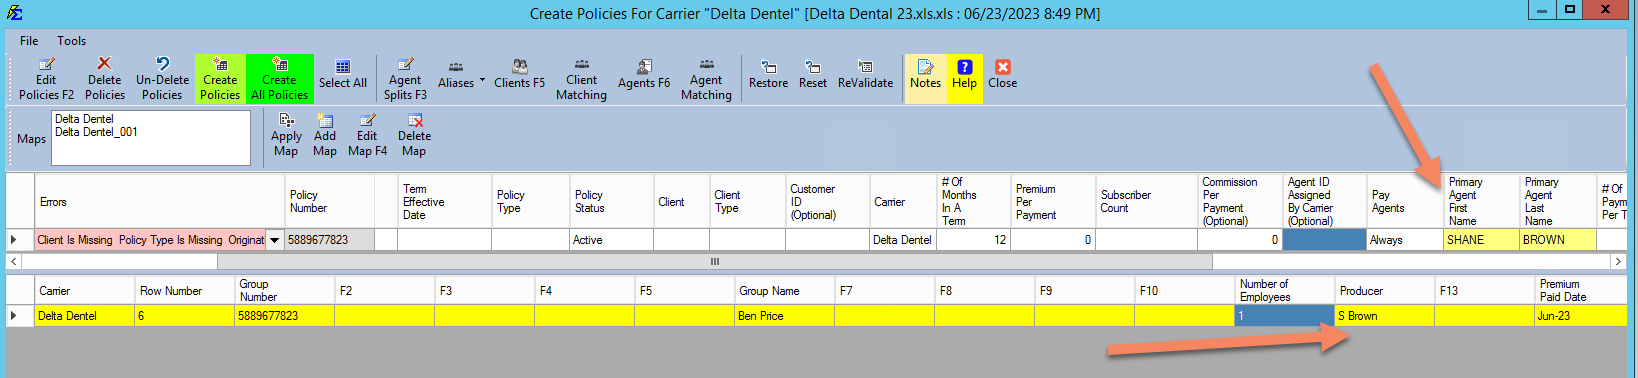
- The agent name is highlighted in yellow in the import grid, confirming the alias was applied.
- The carrier's name variation is replaced with the master Agent name from your database.
- In all future imports, that specific name variation is automatically converted to the master name without prompting you again.
🔧 Troubleshooting
The system suggested a match that is actually a different agent. Leave the checkbox unchecked for that row. The system will treat the name as a new agent and create a separate record. No alias will be created.
Agent Matching didn't appear during my import even though I expected matches. The system uses phonetic and structural similarity to detect candidates. If names are too different (for example, an abbreviation with no phonetic overlap), the system may not flag them. Before the import, check the Agent List to confirm the agent isn't already in the system under a completely different name. If they are, create the alias manually via Tools → Agent Alias.
I accidentally matched the wrong agent. Navigate to Tools → Agent Alias, select the master agent the alias was assigned to, and delete the incorrect alias. The next import will no longer automatically convert that name.
🔗 Related Topics
- Agent Alias — Manually create and manage agent name aliases.
- Client Matching — The equivalent process for client name deduplication.
- Create Policies — The import workflow where Agent Matching occurs.
- Agent List — Verify whether an agent already exists in your database.
Need help? Contact support@commission-tracker.com