Create Policies
The Create Policies utility resolves "Policy Does Not Exist" errors from a carrier statement import. Instead of manually creating new policies one at a time, this screen converts raw data from the carrier file directly into active policies in Commission Tracker.
💡 Why Use This
Use Create Policies when:
- An import flagged missing policies — The ICSE screen shows "Policy Does Not Exist" errors for policy numbers not yet in your database.
- You are onboarding a new carrier — The carrier's first statement likely contains policies that haven't been entered yet.
- You want to create multiple policies at once — Bulk creation from the statement data is faster and more accurate than manual entry.
🗺️ How to Access
- Run an Import Carrier Statement and complete the import.
- On the ICSE screen, select rows with "Policy Does Not Exist" errors.
- Click Create All Policies.
Interface Overview
The screen is divided into two sections:
- Lower Grid — Displays the raw data exactly as it appeared on the carrier statement.
- Upper Grid — The "Pending Policies" workspace where you map, edit, and validate data before it is committed to the system.

The 4-Step Creation Process
1. Mapping Data
Tell the system which columns in the carrier file correspond to policy fields in Commission Tracker. See Mapping Data for full mapping instructions.
- Light Blue Columns — Data you have mapped manually.
- Grey Columns — System-mapped data that cannot be changed.
- Fixed Values — Use the "Fixed Value" option in your mapping to automatically assign static data (such as Carrier Commission Table or term length) to every pending policy.
2. Validating and Editing
Before a policy can be created, it must be marked "Valid." Issues appear in the Errors column.
- Double-click a row to edit a single policy.
- Hold CTRL and click multiple rows to edit them simultaneously (for example, setting the same Policy Type for 10 rows at once).
- Green highlighted rows — A new Client name that will be created automatically along with the policy.
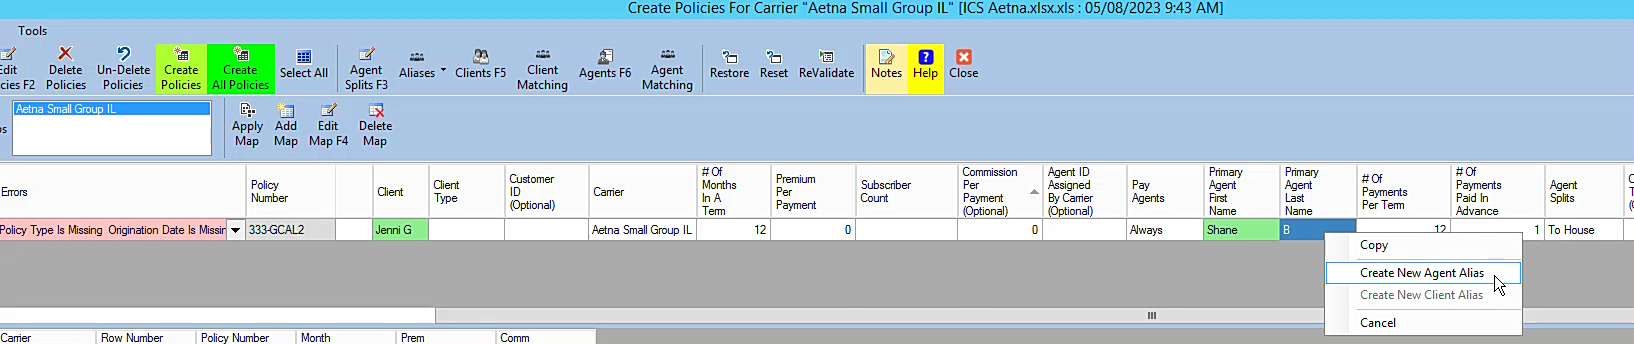
3. Creating Aliases
If an Agent or Client name in the statement doesn't match your database, right-click the name to quickly create an Alias. This ensures future imports map correctly without manual intervention.
4. Committing the Policies
Once the Errors column is clear, select your rows and click Create Policies. This officially converts the pending data into active policies in your system.
Toolbar Reference
| Button | Function |
|---|---|
| Edit (F2) | Opens the editing window for selected pending policies. |
| Agent Splits (F3) | Assign Policy-Specific Agent Splits if not using global carrier table splits. |
| Restore | Brings back policies that were previously created or deleted in the current session. |
| Reset | Clears all manual edits and mappings to start fresh. |
| ReValidate | Refreshes the error list to confirm your edits resolved all issues. |
Grid Color Key:
- Green — New Client or entity that will be created along with the policy.
- Yellow — The raw data row in the Lower Grid that corresponds to your selected pending policy.
🔧 Troubleshooting
Error: Cannot have both Carrier Table and Commission Per Payment. You must choose one method for tracking revenue. Assign either a Carrier Commission Table for automated auditing, or a manual Commission Per Payment value — not both. Remove one of the values from the policy row, then revalidate.
A policy shows errors even after I edited it. Click ReValidate to refresh the error list. Some validation errors don't clear until the system re-checks the row after your changes are saved.
An Agent or Client name isn't matching the database. Right-click the name in the Upper Grid and create an Alias. See Agent Alias or Client Alias for details. Once the alias is saved, the row will validate correctly.
I committed the wrong policies and need to undo. Policies created through this screen are added to your active database immediately. To remove them, use Delete Policies. The original import payments that triggered the errors will remain in the ICSE queue and can be retried once the correct policies exist.
🔗 Related Topics
- Mapping Data — Detailed guide to the column mapping process.
- Errors — Import Carrier Statement (ICSE) — The screen where you launch Create Policies.
- Retry Payments — Post payments after policies are created.
- Agent Alias — Map agent name variations to your database.
- Client Alias — Map client name variations to your database.
Need help? Contact support@commission-tracker.com